Scared

•May 13, 2007 • 1 Comment

In 2004, before I had a cell phone, I was working a split shift and coming home around 7:30 at night. I stopped at a pay phone on the way, called home to see if the hubby was there (he was planning to be out that night), and got the answering machine. I went to the next phone and called again, in the event he’d been in the bathroom or someplace. Still no answer. So, I stopped to get carryout for myself and continued on home, knowing that hubby wasn’t there.

When I pulled up in front of the display, I noticed the wind that night had done a bit of knocking over, particularly of the scarecrow. So I pulled alongside the road and went thrashing through the ditch to get to my props. While adjusting the cornstalks and trying to get them upright, I heard a noise, and thought I saw movement out of the corner of my eye. I turned my head, didn’t see anything, so just shrugged and continued what I was doing.

After another minute or so, I turned around and there was a figure next to me, with a headlight on top of its head. I started screaming, and screaming, and couldn’t stop for a good ten minutes. It was my dear husband, who I KNEW wasn’t home, who’d seen the car on the side of the road and came down quietly through the woods to see if there was something suspicious going on.

I still get a good laugh about it. Oh, the headlight was a headband flashlight he has for hands free stalking. And that wasn’t cornstalking!

A Great Video

•May 12, 2007 • Leave a Comment

Normally I’d prefer to keep these writings to myself, but someone at Halloween Forum found this video, and I just have to share it. It’s way too funny.

This Haunted House – Episode I: How To Make Old Fence Panels

Weatherproofing the Crypt

•May 9, 2007 • Leave a Comment

Am I the only one who has left their decorations out this year? Not all of them, but the fence and the crypt never got brought back in this year. The crypt was planned to stay out over the winter, just because it’s a pain in the butt to transport it back, particularly after the devastation from last year’s week before Halloween winds. It went back together, but to prevent thewinds from doing any more damage, I pounded some of my threaded rod stakes into the Windstorm damage 2006 four corners of the crypt and fastened them down with the cable ties. I also attached ropes to the roof and tied them down to concrete blocks. It worked very well. I did bring the roof up to the house for the winter, since that is readily transportable.
This storm we had on April 16, hereinafter known as the Patriot’s Day northeaster, finally did the damage the winter didn’t do. The foam panels came down, the black sheeting took a beating, but the structure still stands. I have some leftover cheap paneling I’m going to cut down to size and add that for walls. A side benefit is that it will give the foam something to actually hold onto, besides the 1×3 frame. I found out last year that not even Gorilla Glue will hold it on if there’s no real base.
A side benefit of making the crypt last year came when my son’s boss dropped him off and asked if I cold use some more of that foam that he had left over from a home improvement project. Heck yeah!! I got several good pieces, enough to redo all my tombstones. I’m tired of hauling the plywood ones down to the road. They hold up very well, but I have way too many of them now.

Top 5 Signs That You’re a Home Haunter

•May 8, 2007 • 31 Comments

Time to bring this blog out of cold storage for the year and list the top 5 ways that you can tell that you’re a home haunter. If you recognize yourself in any of these, you’ve been bitten by the Halloween Home Haunt bug.

You know you’re a home haunter when…

  1. Your neighbors give directions to their houses by starting off with, “You know where the Halloween House is at…” (and the people getting the directions know exactly where that is). Or the other hand, you’re giving directions to your house, and the person hearing them says, “Oh, are you the Halloween House?? I know exactly where that is.
  2. You buy so much PVC, Great Stuff, insulating foam sheets and 1×3 wood that the sales associates at Home Depot start loading up a cart for you when they see you walk in to the store. And they have learned not to ask what it’s for.
  3. Your favorite places to shop are at “Curby’s,” aka the roadside (you wouldn’t believe what people throw away!), home construction sites (hey, they throw away insulating styrofoam! and you can’t have enough tombstones), and the roads leading to the local beaches where you might find pool noodles that have blown off of cars (a corollary to that is when you spot something orange on the side of the road, slam on the brakes and wade through the poison ivy, oftentimes it turns out to be an empty bottle of Tide).
  4. You can’t wait until August when the local hospital holds its annual rummage sale, and you show up with a wheelbarrow because you can’t possibly carry all the computer speakers, rotating fans, phonographs, clothes for your props, and various items that you may be able to use in your haunt. And don’t forget, EVERYTHING has a potential to be a prop.
  5. You really DO have skeletons in your closet (well, at least in your basement).

Thanks to Darren Rowse at Pro Blogger for coming up with the idea for this post.

Moving Day

•March 30, 2007 • Leave a Comment

Last night was moving day for me. I’ve left the original blog I had as there was no features to speak of, and I never even used it.

So, if you’ve seen the sign post, that was originally moved here from blogcrypt. I trashed the other posts I had. But that was a keeper. This won’t be too active of a blog since I don’t really get started making props until the summer, but I will put up the video of my best prop from last year, along with some tips if you’re going to make your own Flying Crank Ghost (FCG).

There are numerous how-tos on the web to make these, with the original created by phantasmechanics. Knockoffs abound. I did mine the usual way, with cheap and/or scavenged parts. Well, other than the motor. The crank is actually a bolt with handle, which my former place of employment makes and packs with their product. I would sometimes make them at work, and I had a particularly beautiful one I kept. Well, as beautiful as an 18 inch steel bar with a bolt welded on can be. I also did the frame with scrap wood from work. That’s the best kind of Halloween prop, made out of free stuff.

Anyway, if you are at all serious about halloween prop making, the Flying Crank Ghost is almost a must have. When she’s flying, especially at night with the black light on her, there’s nothing like it. So, I present to you: Lily.

2006 Sign

•March 30, 2007 • Leave a Comment

So the sign contest didn’t come to pass at Haunt Forum. Oh well, it’s what I really wanted, but the members hath spoken, and Scarecrows it is. But I did my sign anyway. I’ve wanted a street sign since I saw Zombie-F’s, but of course in my style. Also known as cheap, easy and (fairly) fast.
So here is the finished profuct, done in stages over this last weekend of vacation. This is in between the birdbath project finishing touches, and of course destroying some Bluckies to put PVC inside of them. No one told me cutting through the pelvis would be so hard!
Finished Sign
I’m not really going to post a how-to on this, since it’s been done by others. However, there are some things different from Zombie’s and others, which I think it makes easier.

First, I used some craft plywood from Michaels, the 4×24 inch size. I then found the center on an end, marked it, measured down 2 inches on each side and used a ruler to make straight lines to the point. I then borrowed the SO’s clamp and put all five of the pieces together and cut them all at once with my handy dandy, all-purpose ancient jig saw.

With my birdbath project, I had a dark pink wash (acrylic craft paint and water) so decided to add some colors and see what I cam up with. My original intention was to make a sick brown wash, but stopped when I got the green, which was kind of moldy looking. I took a foam brush, and wiped it on both sides and set it to dry.

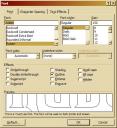
Next day, I printed out the letters in Word, setting the page to Landscape and using the Ruben font at 150 pixels. One thing I always do, to save ink and time, is to set the font to outline. If you’re not sure how to do that, here’s a photo with the settings. This is accessed through Format|Font at the top of the page:
Font Settings

This post has come from the original at blogcrypt. I will not be using that anymore, due to its limitations.